In this tutorial I will show you how to find the code that slows your game down and optimize it.
Even though this tutorial is a part of the HaxelFlixel RPG series, the optimization technique that I'll show you today can be used in any environment, not necessarily a HaxeFlixel game or even a game at all.
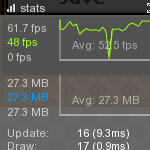
Firstly, let's check out the profiling tool that HaxeFlixel offers - if you launch the game in "debug" mode, you'll be able to open the developer's console using the tilda key ~.
Here, among a lot of useful things, you'll find the FPS counter.
Keeping an eye on it will let you know if the code is executed slowly, and help you determine when that is happening.
Note that to effectively find out if there's a slowdown, the easiest way is to make a stress test - spam your entities to simulate an intensive situation and see if it performs well.
Back to our game - the FPS stays at 60fps most of the time, but sometimes drops lower. How do you actually find out when that happens?
The first and most obvious way is to simply make an educated guess - what kind of operations do we routinely perform that may be intensive? Are there lots of entities that are making some sort of heavy checks every frame?
The second way (or perhaps the second step!) is to look at the performance graph in the console. Using the graph you can see when exactly the drop happens, and then determine what events happened at the same moment in the game, which may have caused the drop.
The third way (or, again, the third step, depending on whether you actually found the root of the problem) is to comment blocks of code and see if that improves the performance. If you see that the game performs much faster after you commented out the enemy AI code, that means you've found your problem and the next step is to optimize it.
The optimization technique I'd like to share today is actually very simple to use, but may have a huge positive impact on your performance.
The game right now is not slow and rarely barely drops below 60 fps, but there are still a few spots to optimize, which may have a boost on performance on lower end machines, or just become useful when you add more content to the game, intensifying the CPU load.
One of the classes that we can optimize is the Enemy.hx class, specifically the movement AI. If you look at it right now, there's a piece of code that is executed every frame if the player is in Walking mode.
Here it is:
if (wandering) {

	var startPoint:FlxPoint = FlxPoint.get(x + PlayState.TILE_WIDTH / 2, y + PlayState.TILE_HEIGHT / 2);

	var heroPoint:FlxPoint = FlxPoint.get(hero.x + PlayState.TILE_WIDTH / 2, hero.y + PlayState.TILE_HEIGHT / 2);

	var pathToHero:Array<FlxPoint> = tilemap.findPath(startPoint, heroPoint, false);


	if (tilemap.ray(startPoint, heroPoint) && pathToHero.length <= 5 && hero.active) {

		wanderTicks = 300;

		path.start(this, pathToHero);

	}

...
You can see that there are two potentially heavy checks being done. First of all, we're casting a ray between our hero and enemy to check if there's a collision with any wall tiles. Keep in mind that our map is fairly large (50x50!) and this kind of calculation is performed every frame multiple times, depending on how many enemies you have.
The second intensive check is done in the same spot - we calculate a path to the hero and check if the length of the path is less than or equals 5. In other words, we're using the pathfinding function, which can be considered a heavy calculation.
My solution is to nest the conditions. Look:
if (wandering) {

	var startPoint:FlxPoint = FlxPoint.get(x + PlayState.TILE_WIDTH / 2, y + PlayState.TILE_HEIGHT / 2);

	var heroPoint:FlxPoint = FlxPoint.get(hero.x + PlayState.TILE_WIDTH / 2, hero.y + PlayState.TILE_HEIGHT / 2);


	if (hero.active && tilemap.ray(startPoint, heroPoint)) {

		var pathToHero:Array = tilemap.findPath(startPoint, heroPoint, false);

		if(pathToHero.length <= 5){

			wanderTicks = 300;

			path.start(this, pathToHero);

		}

	}

...
The conditionals are now nested, meaning that the second will not even be attempted if the first one fails. Always go from the least expensive conditional to the most expensive one. In this case, we first check whether the hero is active. Very cheap - no calculations needed. Right after that, we use raycasting to see if there's a line between the hero and the enemy. This second conditional will not even be attempted if the hero is not active in the first place. This is how much we can already potentially save by simply switching places of the conditions!
Thirdly, if both of the first 2 conditionals returned true, we calculate a path to the hero and do the usual thing. Again, this third conditional will not even be attempted if any of the first two failed.
This is how you can potentially save a lot of CPU resources by simply nesting conditionals sorted by their price. No code was added or removed!
There are more ways to optimize your code, of course. Sometimes, calling an expensive function may not even be needed, and can be replaced with a much cheaper and approximate solution. For example, instead of finding a path between the hero and the enemy to find out the distance between them, we can make a simple distance check between two points on a 2d plane - a much cheaper solution, even though a less accurate one.
If you prioritize performance over accuracy in effects or mechanics that barely have any visible differences, it is often better to go with the cheaper and less accurate solution. You're making a game, after all, not an absolutely realistic simulation.
That, of course, only applies to things that do not directly affect your gameplay that you have in mind.
I hope you've found this helpful.