The movement in this RPG will be mouse-based, i.e. the player clicks on a tile and the character moves there on their own. This kind of movement is also used in real time strategy games.
During the implementation of this feature we are going to use the built-in pathfinding algorithm that HaxeFlixel includes, but a few things need to be done before we dive into the actual pathfinding.
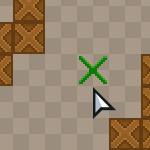
When the player clicks on a tile, a marker should appear, indicating whether it is possible or not possible to move to that position. The mouse coordinates need to be translated to tile coordinates. In this part we'll add that.
We'll need to add 2 new image assets to our project, here they are:


Add them to assets/images/ directory as marker_move.png and marker_stop.png.
Go to PlayState.hx class and introduce a new variable:
private var movementMarker:FlxSprite;Add a new bit that instantiates the marker and makes it invisible:
movementMarker = new FlxSprite();

movementMarker.visible = false;

add(movementMarker);
And finally, add this piece of code to the end of the update() function, I will explain what it means in a second:
// Mouse clicks

if (FlxG.mouse.justReleased)

{

	var tileCoordX:Int = Math.floor(FlxG.mouse.x / TILE_WIDTH);

	var tileCoordY:Int = Math.floor(FlxG.mouse.y / TILE_HEIGHT);


	movementMarker.visible = true;

	if(tileMap.getTile(tileCoordX, tileCoordY)==2){

		movementMarker.loadGraphic(AssetPaths.marker_move__png, false, 16, 16);

	}else {

		movementMarker.loadGraphic(AssetPaths.marker_stop__png, false, 16, 16);

	}

	movementMarker.setPosition(tileCoordX * TILE_WIDTH, tileCoordY * TILE_HEIGHT);

}
First of all, we check if the mouse was clicked since last frame. Calculate the tile coordinates using a bit of math - divide the mouse position number by TILE_WIDTH or TILE_HEIGHT to find out the coordinate in tiles, instead of pixels. Round the values.
We then make the marker visible and, using the calculated coordinates, check whether the clicked tile has the value "2", which is the ground tile index. If that's true, we set the marker image to the green cross. Otherwise, if the player clicked on a wall or a void tile, the red cross is displayed.
Position the marker to the tile that was clicked.
Full PlayState.hx code:
package ;


import flixel.FlxCamera;

import flixel.FlxG;

import flixel.FlxSprite;

import flixel.FlxState;

import flixel.text.FlxText;

import flixel.tile.FlxTilemap;

import flixel.ui.FlxButton;

import flixel.util.FlxColor;

import flixel.util.FlxMath;

import flixel.util.FlxPoint;

import openfl.Assets;


/**

 * A FlxState which can be used for the actual gameplay.

 */

class PlayState extends FlxState

{

	private var tileMap:FlxTilemap;

	static var TILE_WIDTH:Int = 16;

	static var TILE_HEIGHT:Int = 16;

	static var LEVEL_WIDTH:Int = 50;

	static var LEVEL_HEIGHT:Int = 50;

	static var CAMERA_SPEED:Int = 8;

	private var camera:FlxCamera;

	private var cameraFocus:FlxSprite;

	private var movementMarker:FlxSprite;

	/**

	 * Function that is called up when to state is created to set it up.

	 */

	override public function create():Void

	{

		super.create();


		tileMap = new FlxTilemap();

		tileMap.loadMap(Assets.getText("assets/data/map.csv"), "assets/images/tileset.png", TILE_WIDTH, TILE_HEIGHT, 0, 1);

		add(tileMap);


		cameraFocus = new FlxSprite();

		cameraFocus.makeGraphic(1, 1, FlxColor.TRANSPARENT);

		add(cameraFocus);


		camera = FlxG.camera;

		camera.follow(cameraFocus, FlxCamera.STYLE_LOCKON);


		movementMarker = new FlxSprite();

		movementMarker.visible = false;

		add(movementMarker);

	}


	/**

	 * Function that is called when this state is destroyed - you might want to

	 * consider setting all objects this state uses to null to help garbage collection.

	 */

	override public function destroy():Void

	{

		super.destroy();

	}


	/**

	 * Function that is called once every frame.

	 */

	override public function update():Void

	{

		super.update();


		// Camera movement

		if (FlxG.keys.anyPressed(["DOWN", "S"])) {

			cameraFocus.y += CAMERA_SPEED;

		}

		if (FlxG.keys.anyPressed(["UP", "W"])) {

			cameraFocus.y -= CAMERA_SPEED;

		}

		if (FlxG.keys.anyPressed(["RIGHT", "D"])) {

			cameraFocus.x += CAMERA_SPEED;

		}

		if (FlxG.keys.anyPressed(["LEFT", "A"])) {

			cameraFocus.x -= CAMERA_SPEED;

		}


		// Camera bounds

		if (cameraFocus.x < FlxG.width / 2) {

			cameraFocus.x = FlxG.width / 2;

		}

		if (cameraFocus.x > LEVEL_WIDTH * TILE_WIDTH - FlxG.width / 2) {

			cameraFocus.x = LEVEL_WIDTH * TILE_WIDTH - FlxG.width / 2;

		}

		if (cameraFocus.y < FlxG.height / 2) {

			cameraFocus.y = FlxG.height / 2;

		}

		if (cameraFocus.y > LEVEL_HEIGHT * TILE_HEIGHT - FlxG.height / 2) {

			cameraFocus.y = LEVEL_HEIGHT * TILE_HEIGHT - FlxG.height / 2;

		}


		// Mouse clicks

		if (FlxG.mouse.justReleased)

		{

			var tileCoordX:Int = Math.floor(FlxG.mouse.x / TILE_WIDTH);

			var tileCoordY:Int = Math.floor(FlxG.mouse.y / TILE_HEIGHT);


			movementMarker.visible = true;

			if(tileMap.getTile(tileCoordX, tileCoordY)==2){

				movementMarker.loadGraphic(AssetPaths.marker_move__png, false, 16, 16);

			}else {

				movementMarker.loadGraphic(AssetPaths.marker_stop__png, false, 16, 16);

			}

			movementMarker.setPosition(tileCoordX * TILE_WIDTH, tileCoordY * TILE_HEIGHT);

		}

	}

}
If you test your game right now, you'll notice that when you click on the tiles, a marker will appear, and its color will change depending on whether you clicked on a walkable area or an obstacle.
We'll begin adding the actual hero movement in the next part!