
Practice is the best way to learn anything.
Let's begin our journey into Haxe by building a simple classic Pong game. This tutorial series will cover basic game development challenges and get us acquainted with Haxe and OpenFL at the same time.
If you haven't installed Haxe and/or OpenFL yet, follow this tutorial first. Otherwise, let's make a game!
I'm using FlashDevelop IDE for this project, and recommend that you do too. If you use something else - no problem, the code stays the same.
If you're using FlashDevelop like me, create a new OpenFL project by going to the Project menu and selecting New Project, then select OpenFL project.
You'll end up with a directory with some subdirectories. Find the 'src' folder and open the generated Main.hx class.
The contents of the main class should be something like this:
package ;


import openfl.display.Sprite;

import openfl.events.Event;

import openfl.Lib;


class Main extends Sprite

{

	var inited:Bool;


	/* ENTRY POINT */


	function resize(e)

	{

		if (!inited) init();

		// else (resize or orientation change)

	}


	function init()

	{

		if (inited) return;

		inited = true;


		// code

	}


	/* SETUP */


	public function new()

	{

		super();

		addEventListener(Event.ADDED_TO_STAGE, added);

	}


	function added(e)

	{

		removeEventListener(Event.ADDED_TO_STAGE, added);

		stage.addEventListener(Event.RESIZE, resize);

		#if ios

		haxe.Timer.delay(init, 100); // iOS 6

		#else

		init();

		#end

	}


	public static function main()

	{

		// static entry point

		Lib.current.stage.align = openfl.display.StageAlign.TOP_LEFT;

		Lib.current.stage.scaleMode = openfl.display.StageScaleMode.NO_SCALE;

		Lib.current.addChild(new Main());

		//

	}

}
This is as basic as an OpenFL template can get. We'll be using this as the base of our game. The existing code sets up OpenFL essentials and needed listeners, expecting the developer to start writing the functional code in init().
It's worth noting that the Main class extends Sprite. Sprite class comes from Flash, which OpenFL is mimicking. Sprite is the most basic element that can be represented visually. Any graphical object extends Sprite directly or indirectly.
If you look around the project directory, you'll also find a file called application.xml. This is where the configuration of your application lays - here you can change various attributes. Let's change the following 2 lines, to set the size of our program to 500x500 and background to #333333:
<window background="#333333" fps="60" />

<window width="500" height="500" unless="mobile" />
We can now start making our Pong game.
A Pong game usually has 3 objects on the screen - 2 platforms and 1 ball. Let's create a class for each of the object type.
Create a new class in the same directory as Main.hx (if you're using FlashDevelop, right click on the directory and select New Class). Call the class Platform.hx.
Add this code to that class:
package ;

import openfl.display.Sprite;


class Platform extends Sprite

{


	public function new()

	{

		super();

		this.graphics.beginFill(0xffffff);

		this.graphics.drawRect(0, 0, 15, 100);

		this.graphics.endFill();

	}


}
As you can see, the class extends a Sprite, because it will represent a graphical object. The first line in the constructor, super(), is required. This command calls the constructor of the parent class (Sprite in this case). This is not done automatically because you may sometimes want to decide at what point to call the parent's constructor, but in this case this has to be the first thing we do.
Once the Sprite base is initialized using super(), we draw a rectangle using OpenFL's graphical API. This part is very similar to AS3, if you are familiar with it.
The first method - beginFill() - prepares to fill a shape with a solid color. I picked white. After that we draw the rectangle by providing it coordinates and the size. Ending with an endFill() method is not required but is considered good practice.
Create a Ball class similarly, and add this code inside:
package ;

import openfl.display.Sprite;


class Ball extends Sprite

{


	public function new()

	{

		super();

		this.graphics.beginFill(0xffffff);

		this.graphics.drawCircle(0, 0, 10);

		this.graphics.endFill();

	}


}
As you can see, we draw a circle this time, instead of a rectangle.
Now that we have these two classes, go back to the main class and declare 3 variables, which will represent 2 platforms and 1 ball.
Right after the Main class brackets are opened, add these lines:
private var platform1:Platform;

private var platform2:Platform;

private var ball:Ball;
The variables are declared.
Go to the init() function, and after the existing content add the following piece of code:
platform1 = new Platform();

platform1.x = 5;

platform1.y = 200;

this.addChild(platform1);
Here we create an instance of the Platform class, and save it to the platform1 variable. Then we set the coordinates of the platform. Note - in this case, the coordinate center is the top left corner of our platform rectangle, because the coordinates that we used to draw the rectangle using drawRect() in Platform.hx class were 0,0.
Add the second platform and the ball in the similar fashion:
platform2 = new Platform();

platform2.x = 480;

platform2.y = 200;

this.addChild(platform2);


ball = new Ball();

ball.x = 250;

ball.y = 250;

this.addChild(ball);
Another note: the coordinate center of the ball is the actual center of the circle, because the drawCircle() method draws the circle around a point with our specified coordinates (in this case - 0,0).
The full Main.hx code now looks like this:
package ;


import openfl.display.Sprite;

import openfl.events.Event;

import openfl.Lib;


class Main extends Sprite

{

	var inited:Bool;


	private var platform1:Platform;

	private var platform2:Platform;

	private var ball:Ball;


	/* ENTRY POINT */


	function resize(e)

	{

		if (!inited) init();

		// else (resize or orientation change)

	}


	function init()

	{

		if (inited) return;

		inited = true;


		platform1 = new Platform();

		platform1.x = 5;

		platform1.y = 200;

		this.addChild(platform1);


		platform2 = new Platform();

		platform2.x = 480;

		platform2.y = 200;

		this.addChild(platform2);


		ball = new Ball();

		ball.x = 250;

		ball.y = 250;

		this.addChild(ball);

	}


	/* SETUP */


	public function new()

	{

		super();

		addEventListener(Event.ADDED_TO_STAGE, added);

	}


	function added(e)

	{

		removeEventListener(Event.ADDED_TO_STAGE, added);

		stage.addEventListener(Event.RESIZE, resize);

		#if ios

		haxe.Timer.delay(init, 100); // iOS 6

		#else

		init();

		#end

	}


	public static function main()

	{

		// static entry point

		Lib.current.stage.align = openfl.display.StageAlign.TOP_LEFT;

		Lib.current.stage.scaleMode = openfl.display.StageScaleMode.NO_SCALE;

		Lib.current.addChild(new Main());

		//

	}

}
Run the program now (Ctrl+ENTER or the "Test Project" icon in the toolbar), but remember to set the compiler target to neko or flash, if you don't have other compilers installed. Html5 is an option too.
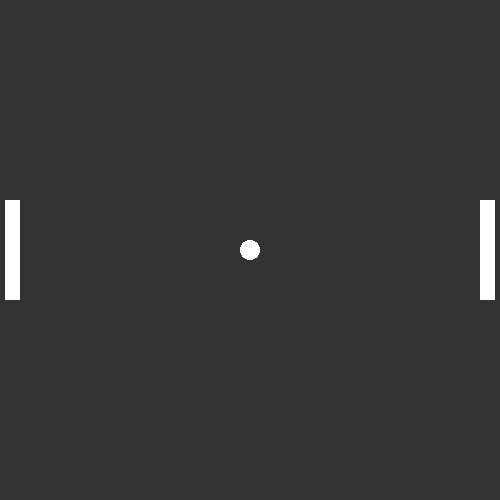
The results should look like this:
We will start making things move in the next part of the tutorial.